|
|
VSAAB
-- The Vintage SAAB Information Source! VSAAB Articles How To Weld SAAB Floor Pans |
 |
|
|
VSAAB
-- The Vintage SAAB Information Source! VSAAB Articles How To Weld SAAB Floor Pans |
|
PLEASE NOTE: Welding is an inherently
hazardous activity. The procedures described below MUST be performed
using all applicable safety equipment and procedures.
| Let me start off by
saying that I am not a professional welder and would never claim
to be. Assuming that you are not an experienced welder
either, you might benefit from my recent run-in with a rusty
floor pan. Although the car was a 93B and not a Sonett,
the basic rules of fabricating and welding are the same.
More vintage Saabs are sent to the scrap yard due to a rusty floor pan than for any other reason. I have seen dozens of Sonetts that were very good cars except for a serious case of floor rot. As time marches on, the chances of finding a rust free car diminishes. |
|
| Those of you who
are now deciding to tackle a vintage Saab restoration may have
no choice but to restore a car that requires at least some rust
repair. Paying someone to repair the rust is always a
option, but the cost can easily exceed the car's restored
value. After purchasing my 1958 93B, I quickly found out
that the rust was much more extensive than I had originally
thought. I had an old arc welder in my garage so I tried
using it on some scrap pieces of metal to see if my welding
ability had somehow improved since the last time I had used
it. No such luck. My next step was to ask around for some friendly advice. Everyone told me the same thing, that MIG welding has revolutionized the way to stick two pieces of metal together. Deciding to purchase a MIG was made easier by trying one out at friends house. What a revelation! |
|
| Not wanting to spend
a lot of money, I went to the local Sam's Club and picked up a MIG
for only $300.00. The welder didn't come with the necessary
gas tank so one was purchased at a welding supply store along with
a few other accessories for an additional $100.00. Fortunately
the welder came with a "How To" video that explained the
basics. A MIG welder utilizes a wire feed mechanism that
eliminates the use of a welding rod. No more problems
starting the arc, just pull the trigger and presto, your welding.
After very little practice on some scrap metal I was getting
professional results.
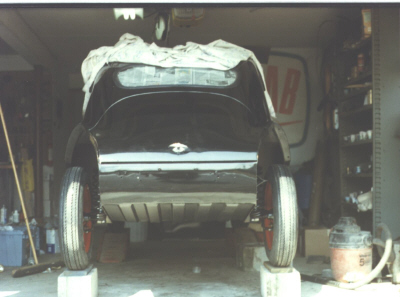
Before cutting anything off your car, make sure it is adequately supported underneath. The last thing you need is for the car to twist while your working on it. After supporting the car, take several measurements of the cars various dimensions. Rocker panel removal, for instance, should only be done after careful door opening measurements are taken. A few diagonal measurements in the door opening and across the width of the car should also be made. Cut out and replace one panel at a time. The removal of too many panels can cause the car to twist. |
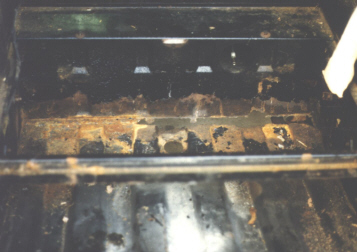
| Now let's talk
about all the amazing discoveries I made while using my MIG
welder. Try as you might, you can not weld to rust!
This I found to be very unfortunate since most of my floor pan
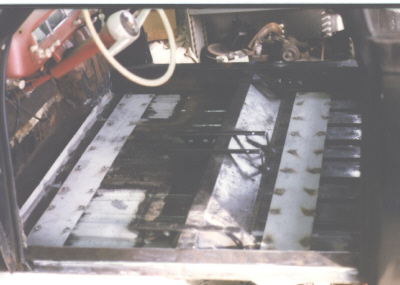
had a thick layer of rusty scale. When cutting out
sections of the floor panel, make sure you cut back to solid
metal. Grinding away the rust to find a surface suitable for
welding is tricky business. I found that if more than 15
or 20 percent of the metals surface was removed by grinding,
there was not enough metal left for a strong weld. To make
a long story short, two pieces of clean metal of similar gauge
and composition are needed for trouble free welding.
New panels should be
"tack welded" in place before doing the final welding.
Although MIG welding doesn't produce as much heat as arc
welding, it still can warp a piece of metal very easily.
For this reason you should tack the corners of the panel first,
then tack the rest of the panel in place in a star pattern. |
|
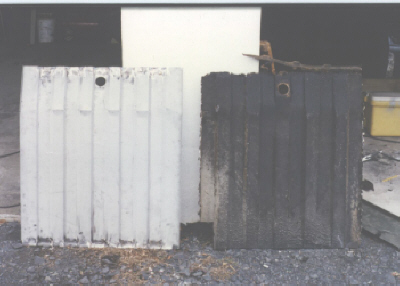
| Once the new panel is
flanged and trimmed to fit, it is time to check the area to be
welded for gaps. The replacement panel has to seat tightly
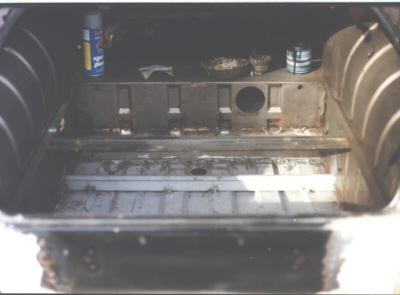
up against the metal that it will be welded to. Any air gaps between the two pieces will cause the welder to spit and sputter resulting in a bad weld. You can eliminate the air gaps by using Vise-Grips and C-clamps to squeeze the pieces together. Another method is by installing sheet metal screws through the flanges prior to welding. Later, the screws can be removed and the holes welded closed. As stated in previous articles, corrugated floor panels should never be replaced with flat sheet steel, regardless of the replacement panels gauge. A flat piece of steel three times the thickness of the original corrugated piece will have nowhere near the rigidity of the original. Here's the proof: After removing the trunk floor from my 93B, I cut out a piece of 18 gauge cold roll sheet steel to use as a replacement. When the sheet was leaned against a wall, it literally bowed in the middle. A small child could have folded the piece in half with his or her bare hands. The sheet was then brought to a metal fabricator along with the original trunk floor so that the corrugations could be reproduced. Twenty minutes and $40.00 later, I was on my way home to start installation. The trunk floor needed to be bent at a 15 degree angle to go under the gas tank. The bend had to be made across the width of the floor, against the corrugations. The once flimsy piece of metal was now so rigid that I couldn't even begin to bend it! |
|
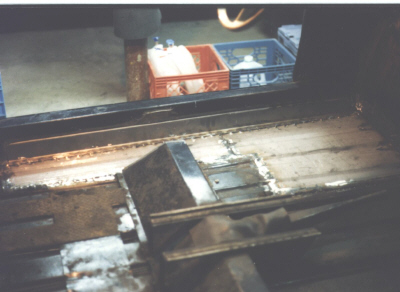
| The next day I
brought the trunk floor to the factory where I work to try to make
the desired bend. The trunk floor was placed on the
floor. We then put a 2X4 across the panel, just above where
we wanted it to bend. The legs of a steel table were put on
the 2X4. Three BIG men, with a combined weight of more than
700 pounds, sat on the edge of the table, directly over the
legs. A fork lift with 6000 pounds of lift capacity was then
driven into position. The tips of the forks were placed
under the leading edge of the trunk floor. The idea was to
lift the edge of the trunk floor, allowing it to buckle under the
2X4. To our amazement, when the trunk floor was lifted by the fork lift, so were the three men on the table! Time to break out the heavy artillery. Using the forklift, we tipped a 8000 pound stamping press over enough to slip the trunk floor under its base. Our stamping press is the same type used in the automobile industry for fabricating light gauge steel parts. The forklift was positioned with the forks under the leading edge of the trunk floor. As the forklift strained under the weight of the stamping press, we noticed that the press was actually starting to tilt over. The trunk floor was carrying a load of several thousand pounds! Then with a huge crunch, the trunk floor finally buckled under the stamping press's enormous weight. As luck would have it, the bend was at the perfect angle for going under the gas tank! |
|
| This little story
should demonstrate the importance of maintaining the original
corrugations in your car's floor pan. Lets face it, if they
weren't necessary, Saab wouldn't have gone through the time and
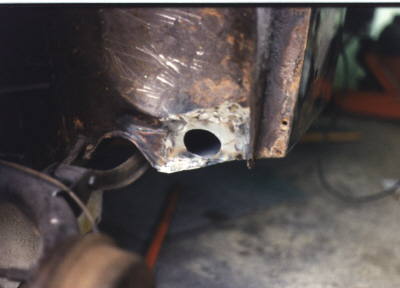
expense of putting them there in the first place. There are
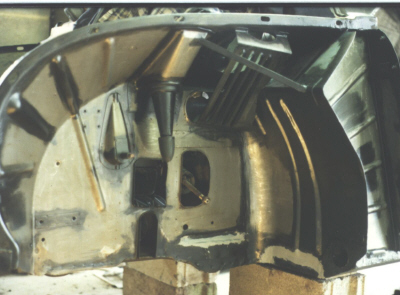
areas of the floor where the ends of the corrugations must be
flattened out before the panel is welded in place. To
accomplish this, I made triangular cuts in the side of each
corrugation with a hack saw. I made the cuts 1- 1/2 inches
in from the edge of the panel. With the triangular cutouts
removed and the ends flattened, the seams can be welded closed
with minimal distortion to the panel. This is not nearly as
difficult as it sounds. Unfortunately, Saab doesn't stock floor panels for 93s, 95s, 96s or Sonetts anymore, making panel replacement that much more difficult. Floor panels must be remanufactured by a steel fabricator using the old pieces as a guide. Jack Ashcraft in Medford, Oregon has remanufactured many vintage Saab floor panels and has them available in his catalog. Jack can be reached at (541) 779-0731. |
|
| When using a local
fabricator, make sure you instruct them to make the new pieces at
least an inch larger than the original to allow for final
trimming. When grinding the slag off your welds, have all of
the car's glass covered with cardboard. The hot flying slag
can either break the glass or actually embed itself inside the
glass. One look at my 93B's rear window will prove this very
interesting phenomenon. After panel replacement, paint all the seams with a high quality primer. After the primer has cured, apply seam sealer. The new panels can now be painted and undercoated. My rust job included replacing the following parts: rocker panels, passenger compartment floor, just behind the front wheel wells, two 6" wide strengthening plates that run the width of the car, trunk floor including the brace behind the gas tank and the lower axle tunnel where it meets the trunk floor. Total cost for the steel and fabrication was less than $300.00. |
|
| As you can see, doing
this type of work yourself can save a ton of money. My total
expenses were under $850.00 and I got to keep the MIG welder when
I was done! True, l did spend around 250 hours in the
garage, but just think what the labor bill would have been had I
paid someone else to do it.
In all fairness, a professional could have knocked the job out in less than half the time, so the labor bill would have come in at a mere $5000.00. Rust repair is not for the mechanically challenged, but with a MIG welder at your side, you will be amazed at just how much you can do (and how much money you can save) on your very first project. |
|
|
Bruce
Turk, 3/01
|
So, what do you think of this? Send us your thoughts and comments by clicking HERE!
All product and trade names
mentioned on this site are the trademarks of their respective companies.
�VSAAB, 1998-2001 All rights
reserved. VSAAB is not affiliated with SAAB Cars USA or SAAB Automobile.
"VSAAB" is a trademark of the San Diego SAAB Owner's Group, San
Diego, California USA.
All information here is presented as personal opinion. Ask, think, do.
Last modified:
January 10, 2023