|
|
VSAAB
-- The Vintage SAAB Information Source! VSAAB Articles Sonett Windshield & Rear Glass Replacement |
 |
|
|
VSAAB
-- The Vintage SAAB Information Source! VSAAB Articles Sonett Windshield & Rear Glass Replacement |
|
The windshields on all Sonetts and the rear glass on Sonett II/V-4�s are held in place in the same manner. A chrome-colored plastic lock strip spreads a rubber gasket to provide a watertight seal. Glass removal is generally easy. Installation, on the other hand, can get frustrating.
|
Windshield Removal
Remove the rear view mirror and sun visors. Using a small screwdriver, carefully pry up one end of the lock strip at the seam. Pull the lock strip completely out of the gasket. Using a sharp knife, break the seal between the gasket and the glass. Make sure the knife blade is all the way in. Repeat this process on both the inside and outside of the glass. From the inside of the car, press a two-foot long 2x4 wrapped in a towel against the top edge of the glass. The purpose of the wood block is to exert even pressure along the top of the windshield to reduce the risk of breakage. Push slowly, building up pressure against the glass. Usually the glass will pop out leaving the gasket in the window opening. It is not a problem if the gasket comes out with the glass. Once the top of the glass comes out an inch or two, it is time to work from the outside of the car. With a Partner, station one person on each side of the car. Continue to pull the glass out at the top and then up. Breakage most often occurs when the glass is twisted or when coming in contact with a hard object like a screwdriver. Store the removed glass on something soft, away from the work area. Windshield Installation After cleaning the body opening with mineral spirits, you are ready for installation. If you are using a new gasket and lock strip, do not use any window sealer during installation. Window sealer can be used, if necessary, after installation. After removal, take a close look at your windshield gasket. The gasket is actually made of four separate pieces, two straight strips and two elbows. The two straight pieces are glued to the elbows, which are located at the bottom corners of the windshield. Now you have to decide how brave and talented you are. You have three choices: 1) Reuse the elbows and make a gasket like the original. 2) Forget about the elbows and force the new gasket around the bottom corners of the window opening. 3) Cut the gasket in two pieces, making 45 degree angle cuts in the corners to create an angled joint. If you don�t reuse the elbows or make angled joints in the corners, you increase the risk of water leakage. To reuse the elbows proceed as follows: Bend the gasket at the elbows until the pieces become separated. Cut your new gasket in two pieces. Make them one inch longer than the originals to allow room to �play� with. Using a sharp razor cut the gasket to match the angles of the original. Check the fit by placing the pieces in the window opening. Make sure your new gasket completely fills the window opening. A gasket that is too large is always better than one that is too small. Clean the ends of the pieces with alcohol and attach the gasket to the elbows using Super Glue. Place the gasket in the window opening. If you are not reusing the elbows, proceed as follows: Put one end in the bottom center of the opening. Push the gasket in, feeding as much material in as possible. When you come back around to the bottom, cut the end off allowing a one-inch overlap with the other end. Spread the two ends apart and pop into place. Squirt a little Super Glue into the seam. If cutting the gasket at 45-degree angles, (It�s not exactly 45 degrees) make the cuts with the gasket on a table. Hold a straight edge over the spot you want to cut. Make the cut with a new razor blade. Whichever method you use, once the gasket is in place; spread the glass channel apart by pressing in an extension chord or rope. This will stretch the gasket making glass installation easier. Allow the cord to stay in overnight. Just before putting in the glass, pull out the cord and spray in a mixture of soap and water. Using a second person to help, place the bottom edge of the glass in first, followed by the sides and top. Use plastic, rubber or wooden tools to pry the gasket over the glass. Press the top of the windshield in place using your block of wood, using slow, even pressure. Before inserting the chrome lock strip, spray soapy water or silicone into the lock strip channel. A lock strip tool should be used, as screwdrivers will work for a little while until you scratch the paint, or gouge your hand. Lock strip tools can be purchased from: Sommer & Maca Industries, Inc, 5501 West Ogden Ave., Cicero, Illinois 60650. Telephone: 800-323-9200. Order one eye handle, part # 201- 1022 and two 3/8� eyes, part #201-1026. The total with shipping should be less than $30 Rear Window Removal, Sonett II/V-4 The only difference in removing the rear glass versus the windshield of a Sonett II/V-4 is the length of the block of wood. The block should be cut so that the ends do not make contact with the curved part of the glass. Before removing the glass, take a close look at how the glass sits in the body opening. Very often the body opening is too small, resulting in the glass sticking out from the body. If this is the case, mark these areas with a piece of tape stuck to the body. After removing the glass, grind 1/16� to 1/8� of fiberglass off these areas with a file or sander. This adjustment will allow the glass to rest in a stress-free environment, possibly preventing future breakage. Rear Window Installation, Sonett II/V4 Insert the gasket and spread the window channel with an extension cord or rope. Allow the cord to stay in overnight. Just before putting in the glass, pull out the cord and spray a mixture of soap and water into the channel. Insert the rear of the glass first and the top edge by the roof last. Cover the roll bar with a towel to protect the glass from breaking should it pop in the window opening. The wooden block should be used to press in the top edge of the glass. Follow the windshield installation instruction to complete the job. Helpful Hints The windshield gasket and lock strip is the same all Sonetts, including the rear window on a Sonett II V-4. The cheapest source I have found for gaskets and lock strips is Restoration Specialties and Supply Inc. PO Box 328 RD #2, Windber, P A 15963. Phone: 814-467 9842, Fax: 814-467-5323. The part number is S1456 and costs about $2/foot. You will need eleven feet for a windshield and 13 feet for the rear glass on a Sonett II /V-4. Don�t forget to ask for the chrome lock strip, which is provided at no charge. There is a charge for the lock strip if purchased separately. Before Installation, always clean the edges of the glass with a razor and mineral spirits or alcohol. Should your window leak after installation, it will be necessary to apply window sealer between the body and gasket and/or the gasket and glass. For best results, remove the lock strip and make sure the gasket is completely dry before apply the sealer. After sealing, reinstall the lock strip and wipe away any excess sealer with mineral spirits. All Sonett windows and body openings are, unfortunately, different sizes. Because of this, special care should be taken when replacing a broken piece of glass with a different one. I have already discussed what to do if a body opening is too small, now let�s determine if the body opening is too large. Before removing the glass, pry back the inside edge of the gasket to expose the edge of the glass. If the glass sits deep in the window channel everything is fine, but if the glass is hanging on the edge of the gasket, the window opening must be made smaller. To accomplish this, lay a bead of silicone caulk on the bottom inside edge of the window opening. Occasionally, the window pillars are too far apart, making it necessary to put caulk down the sides of the opening also. Allow the silicone to cure. Force the gasket over the silicone bead and then install the window. Patience The best piece of advice I can offer is if you start to lose your patience, walk away before you break something! Bruce Turk, 5/02
|
||
| (Click on the images below for a closer look) |
||
|
This is what your windshield
|
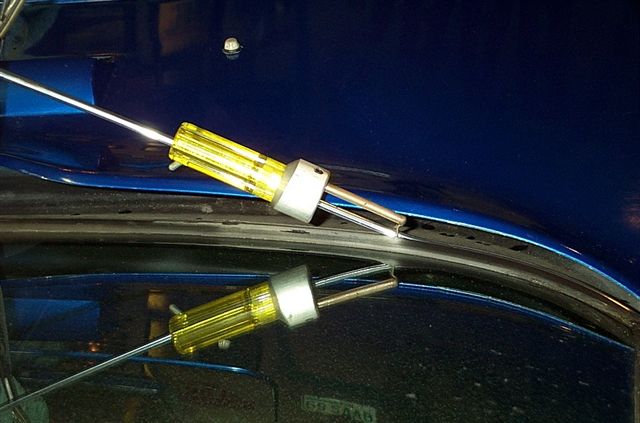
This is a
picture of the lock strip tool. |
The tool, in action! |
So, what do you think of this? Send us your thoughts and comments by clicking HERE!
All product and trade names
mentioned on this site are the trademarks of their respective companies.
�VSAAB, 1998-2002 All rights
reserved. VSAAB is not affiliated with SAAB Cars USA or SAAB Automobile.
"VSAAB" is a trademark of the San Diego SAAB Owner's Group, San
Diego, California USA.
All information here is presented as personal opinion. Ask, think, do.
Last modified:
January 10, 2023